Many people believe that it takes a high level of intelligence to solve the Rubik’s Cube. We will debunk this myth today, showing a simple method for anyone to solve the cube on their first encounter with it.
INTRODUCTION TO THE MOVEMENT OF THE CUBE
In order to apply this method, it is first necessary to consolidate the basic “cubist” terminology so that the each possible cube rotatuion can be universally understood. For this purpose, each movement of the cube has its own coding, as shown in the image below.

Above are all the possible rotations of the cube. The clockwise movements are denoted by the English letters R(Right), L (Left), B(Back), D(Down), F(Front), U(Up). Movements in the counterclockwise direction are denoted by Ri, Li and so on, or by using the apostrophe R’, L’ etc. (the latter notation will be used in this text).
Before proceeding with the following method, make sure that you are sufficiently familiar with the coding of these moves as you will be requires to apply different sequences of them as you proceed.
What is also important is your ability to distinguish the three different types of cube pieces. These are the centre pieces (the central squares are made up of a single colour), the edges (the edges of the cube – i.e. the side pieces – are characterised by two colours, e.g. red-green) and the corners (the corner pieces are consituted by three different colours, e.g. white-green-orange).
STEP 1: WHITE CROSS
The first step towards solving the cube is forming the white cross. To achieve this, it is necessary to locate the white central square, around which four side white squares will be placed. Therefore, bring the surface of the white centre of the Cube to the top and try to “build” the four side edges around it.
BEWARE: The four white edges are NOT placed in random positions. Each piece that includes a white edge must be placed so that the colour of the side of the piece matches the colour of the adjacent centre.

In the example above, the left white cross has been solved correctly, as the white-blue edge of the cube has been found between the white and blue centre. On the other hand, in the right cube the colours of the edges do not match.
If you manage to place all four white edges of the cube in the correct position, you will have solved the white cross correctly. To do this, you need to bring each piece to the position where it should eventually be, between its centres.

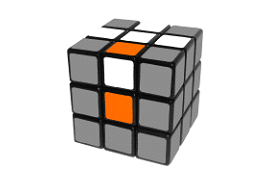
If you are lucky, the white-orange piece in the example will be turned upside down and will be straight away in the desired position. However, if you find yourself in the orientation shown above, then using the algorithm:
F – U’- R – U,
will directly annihilate the problem. Follow the same method for all four pieces and the white cross is ready.
STEP 2 : WHITE CORNERS
The step of solving the white corners is very simple. The first thing you need to do is to bring each corner exactly under the position it needs to be placed (through the required D movements).

Here, for example, the white-green-orange corner should be in the purple position and in the appropriate orientation. To do this, simply place this piece in the pink position and then run the algorithm:
R’ – D’ – R – D
This algorithm works even if your corner is in the purple position from the beginning but with the wrong orientation. Perform it in succession as many times as necessary until the corner is in its final position. Do the same with the remaining three white corners.
The white surface should then be ready to go.

STEP 3 : MIDDLE LAYER
Since the white side is now solved, you can turn it to the bottom of the cube.
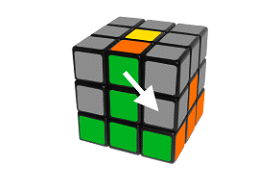
Now it’s time to solve the second layer of the cube. Look for an edge that does not include a yellow colour and with the required U moves, bring the edge to a point where one of its colours touches the matching centre of the cube. Place it shown in the image below, where the green-orange edge is positioned so that its green square is in contact with the green centre of the cube.

Looking at the cube from the front, this edge should go to the right, as indicated by the arrow. Run the algorithm:
U – R – U’ – U’ – R’ – U’ – F’ – U – F
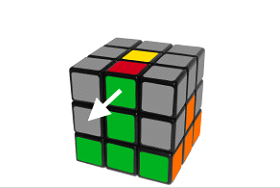
On the contrary, if the edge should be placed on the left (see next picture), then run the algorithm:
U’ – L’ – U – L – U – F – U’ – F’

In the scenario where you cannot locate a yellow-free edge piece, the reason is that one of the yellow-free edges is in the wrong position or orientation. To fix this problem, then insert a yellow edge in the position of the edge you wish to release, according to the algorithms above.
BHMA 4 : YELLOW CROSS
After solving the first two layers of the cube, the only thing remaining is the yellow surface. As portrayed with the white one, its solution first requires the creation of the yellow cross.
At this point, the yellow surface of the cube will be in one of four possible states:
Yellow Dot, Yellow “L”, Yellow Line or (in case that is your lucky day) the Yellow Cross is already formed.

To go from one state to another and finally form the yellow cross, apply the algorithm:
F – R – U – R’ – U’ – F’
ATTENTION: In order for the algorithm to work it is necessary to hold the cube as in the picture above. This means that when you face the cube, the Yellow “L” should be formed on the top left and the Yellow Line should be in horizontal state.
STEP 5 : YELLOW EDGES IN THE RIGHT POSITION
After the yellow cross, it is important to bring the yellow edges so that they match the centres of the sides (as shown in the right cube of the picture).

To do this, perform:
R – U – R’ – U – R – U – U – R’ – U
This algorithm alternates the front and left edges each time as you face at the cube (as indicated by the arrows on the left cube in the photo). Therefore, to run the algorithm, first perform the necessary U moves in order to place two already matched edges on the right and the back of the cube. If this is not possible, then apply the above algorithm from a random point until you succeed. Repeat as many times as necessary.
STEP 6 : YELLOW CORNERS IN THE RIGHT POSITION
In this step you do not need to worry about the orientation of the yellow corners. All you have to do is to bring each one of them in the right place.
To do this, locate a corner that is already in the desired position (in the photo below, this would be the red-blue one) and bring it to the front and right position. Then solve:
U – R – U’ – U’ – L’ – U – R’ – U’ – L

This algorithm will alternate the position of the remaining three corners, leaving the already solved corner still in place. You will need to apply it 1 or 2 times until all the corners are in the right position.
If none of the yellow corners are solved when you start this step, then apply the above algorithm from a random position on the cube and then look for the corner that is solved. Again, you should place it in the front-right position and continue the process as described.
STEP 7 : YELLOW CORNERS ORIENTATION
The last step in solving the cube is to get the yellow corners oriented correctly. It is the step that most beginners often get wrong, so it needs your undivided attention so that all your efforts do not go to waste.

Hold the cube so that you have an unsolved piece in the front-top-right corner (here is the yellow-green-orange corner). Then, apply the algorithm:
R’ – D’ – R – D
This algorithm must be applied 2 or 4 times until the piece is oriented correctly.
Then using the U’ move, bring the next unsolved corner to the front-up-right position and repeat the same procedure. BEWARE! Do not rotate the entire cube. It is critical to only rotate the top layer, otherwise the whole cube will be messed up.
During the last step, the cube may look a lot scrambled and that might lead you to thinking you have made a mistake. Don’t panic, if you have followed the algorithm as described, the solving of the final yellow corner will put everything back into place.
CONGRATULATIONS! You just solved the Rubik’s Cube for the first time. All that remains is to practice this method several times. Gradually, you will be able to memorize all the aforementioned steps and solve the cube faster each and every time.


